
No products in the cart.
The Easter Rabbit Drawing Tutorial
Introduction
Easter is perhaps of the most brilliant and generally celebrated occasion on the planet. Consistently, a large number of invigorated goofs off the world get up on Easter morning to chocolate treats and bright egg chases. These eggs are supposed to be conveyed by the Easter Rabbit, an exceptionally bustling bunny that gets Easter sorcery going!
Note: After learning this tutorial visit more Kids Drawing Tutorials.
This occasion is unique to many individuals, and fanatics of the event might get a kick out of the chance to know how they can figure out how to draw the Easter Rabbit. In the event that you are one of those Easter fans, this will be an instructional exercise that will assist you with appropriately commending this great event. Our bit by bit guide on the most proficient method to attract the Easter Rabbit only 6 simple tasks will show you how fun and simple drawing this sprightly rat can be!
Stage 1 – how to draw The Easter Rabbit
We will start this aide on the most proficient method to draw the Easter Rabbit with the layout of the head and ears. While drawing any of the blueprints for the rabbit, we will utilize a somewhat rugged line. Utilizing this rather than a smooth line will assist with guaranteeing that the rabbit looks quite soft. Draw the framework for the head with a more slender round shape for the top half and a thicker part for the lower half.
Then, at that point, utilize two long, dainty and adjusted shapes for the frameworks of the ears. Finish these off by drawing a few flimsy oval shapes within them for the inward ears, and afterward we can continue on toward stage 2.
Stage 2 – Presently, draw a few facial subtleties and arms for the Easter Rabbit
Since you have the framework for the head and ears done, we can zero in on certain subtleties as well as adding the arms for your Easter Rabbit drawing. For the eyes, draw a few little oval shapes that encapsulate a few significantly more modest round shapes. Then, at that point, there will be an adjusted three-sided nose underneath the eyes, and this will have a few bended lines emerging from the base for the grinning mouth.
Add a squared teeth to the top of the mouth, and afterward draw the lower part of the open mouth. At last, utilize some a greater amount of those spiked lines for the shaggy arms of the Easter Rabbit dropping down. Interface these with an adjusted line close to the highest point of the arms for the tip of an enormous egg the rabbit will before long hold.
Stage 3 – Draw the remainder of the Hidden little treat it is holding
It wouldn’t be a lot of an Easter picture without a major, brilliant Hidden goody! Thus, we will add the remainder of the egg you began attracting the past step of our aide on the most proficient method to draw the Easter Rabbit. To start with, utilize an adjusted line to attract the base portion of the egg a way that makes it seem as though it would interface with the tip you drew beforehand.
Then, it will simply involve enriching the egg! We utilized some sharp lines, little circles and different shapes to adorn our model, yet you could finish it in any capacity that you like!
Stage 4 – Next, draw the legs for the Easter Rabbit
We will polish off the layout for the rabbit in this piece of your Easter Rabbit drawing. That will have you prepared for the last subtleties in the following stage of the aide. We will predominantly be centered around the legs of the rabbit in this step, and you can draw the legs utilizing a few strongly bended lines.
Then, at that point, draw the long, level feet of the rabbit for certain more modest adjusted lines for the toes. You’ll then, at that point, be prepared for those last subtleties in the following stage!
Stage 5 – Add the last subtleties to your Easter Rabbit drawing
This fifth step of our aide on the most proficient method to draw the Easter Rabbit will be tied in with wrapping up a few last subtleties and increments. In the first place, we added some sharp, sharp spiked lines at the foundation of the bunny for the grass that it is perched on. Then, at that point, we added a line to the inside of the mouth to give it some more profundity.
Whenever you have drawn these subtleties, you could likewise add a few extra subtleties of your own! One thought could be to fill the foundation with many brilliant Hidden goodies, and this would truly scrutinize your inventive abilities! How might you wrap up this Easter Rabbit before we continue to the last piece of this aide?
Note: Visit the Early Childhood Education.
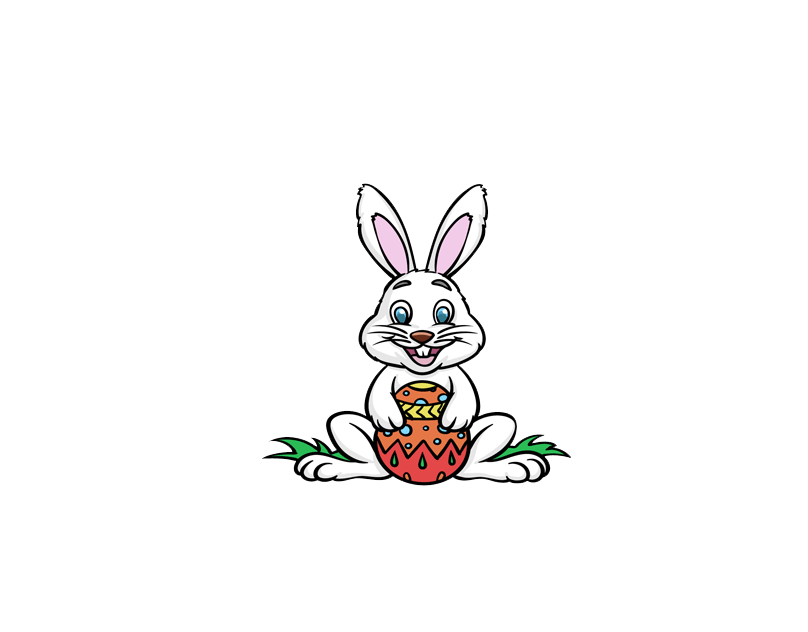
Stage 6 – Polish off your Easter Rabbit drawing with variety
It’s currently time to make them variety fun as you really polish off this picture! The variety point of convergence of this picture would surely be the Hidden little goody he is holding. We utilized a few warm, splendid tones for the egg and afterward kept the shades of the bunny somewhat more muffled interestingly. You could utilize any of your number one tones while shading the egg and the hare! You could likewise try different things with some workmanship mediums like paints, hued markers or pens.
Also, Read Smart Phones esnar obi